MaxCut Support Page
Learn how to get the most out of MaxCut with our comprehensive support articles. Find answers to common questions, step-by-step setup guides, and troubleshooting tips.
Training & Tutorials
Long Expansion on Panels
This article explains what the Long Expansion field does, when to use it, and the exact steps to configure it for single panels or as a default across your job. It also lists where the expansions appear on layouts and reports.
Updated 1 week ago
TL;DR
Long Expansion adds material to both long sides of a panel so you can rough‑cut oversize and then trim to the final dimension (often called tension‑free cutting).
Optimization layouts show expanded (rough‑cut) sizes.
Labels: See expanded sizes on 70 mm x 37 mm : A4 Page , 24 Labels with Expanded Sizes.
Reports: See expanded sizes on Cutting List (Expanded vs Final Sizes), Panel Input Item List, and all Job Layout Reports.
Set per‑panel in the Input Panel window, or set global defaults: Settings → Item Defaults → Input Panel.
What is “Long Expansion”?
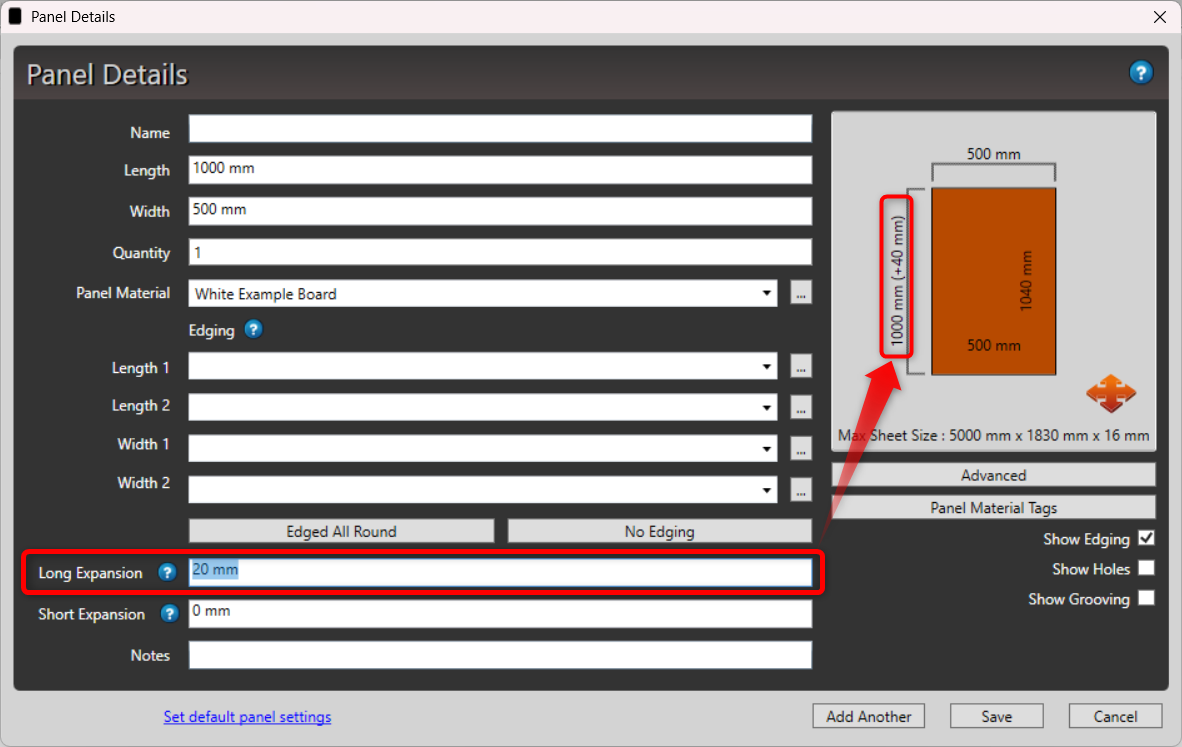
Long Expansion is the amount added to the length of a panel on each long edge. If you enter 20 mm, MaxCut adds +20 mm on the left +20 mm on the right (total +40 mm on length) for the first, rough‑cut pass. The final required size remains unchanged; you’ll trim down to it on the second pass.
Long Expansion affects the length (L).
Use Short Expansion to add to the width (W) in the same way.
Why use it? To prevent stress/tear‑out, remove saw marks, or account for movement before a precise finishing pass.
When to use it
You do a two‑stage cut: rough‑cut oversize → trim to final size.
You’re working with material that moves under tension and benefits from a stress‑relief cut.
You want a clean finish cut on show edges without changing the final spec.
Add/adjust Long Expansion on a single panel
Open your job and go to Input Items → add a Panel or select an existing one.
Open Panel Item Details (double‑click the panel or use the edit button).
In the Panel Details window, locate Long Expansion.
Enter a value. Examples:
10 mm→ adds 10 mm per long side (total +20 mm on length).0→ no expansion.
(Optional) Set Short Expansion if you also want oversize on width.
Click OK to save.
Optimize the job. On the layout, panels will show the expanded (rough‑cut) size.
Note: You don’t need to remove the expansion later. Reports and labels can show final sizes for your finish‑cut stage (see 'Where sizes appear (Layouts & Reports)' below).
Set default expansions for new panels (global)
If you routinely rough‑cut, set defaults so every new panel starts with expansion values.
Go to Settings → Item Defaults → Input Panel.
In Long/Short Expansions, enter your default values.
Choose how defaults apply:
Default for Start of Job — Apply the default to the first panel you add; if you change a later panel’s expansion, that new value becomes the default for subsequent panels.
Default for All Panels — Always use the specified default values for every newly added panel, even if you adjusted previous ones.
Save your settings.
Worked example
Required final size: 1000 × 500 mm (L×W)
Long Expansion: 20 mm (per side) → rough‑cut length: 1040 mm
Short Expansion: 0 mm → rough‑cut width: 500 mm
Add a 20mm Long Expansion to the panel. Note that the preview updates to show the long expansion next to the Length.
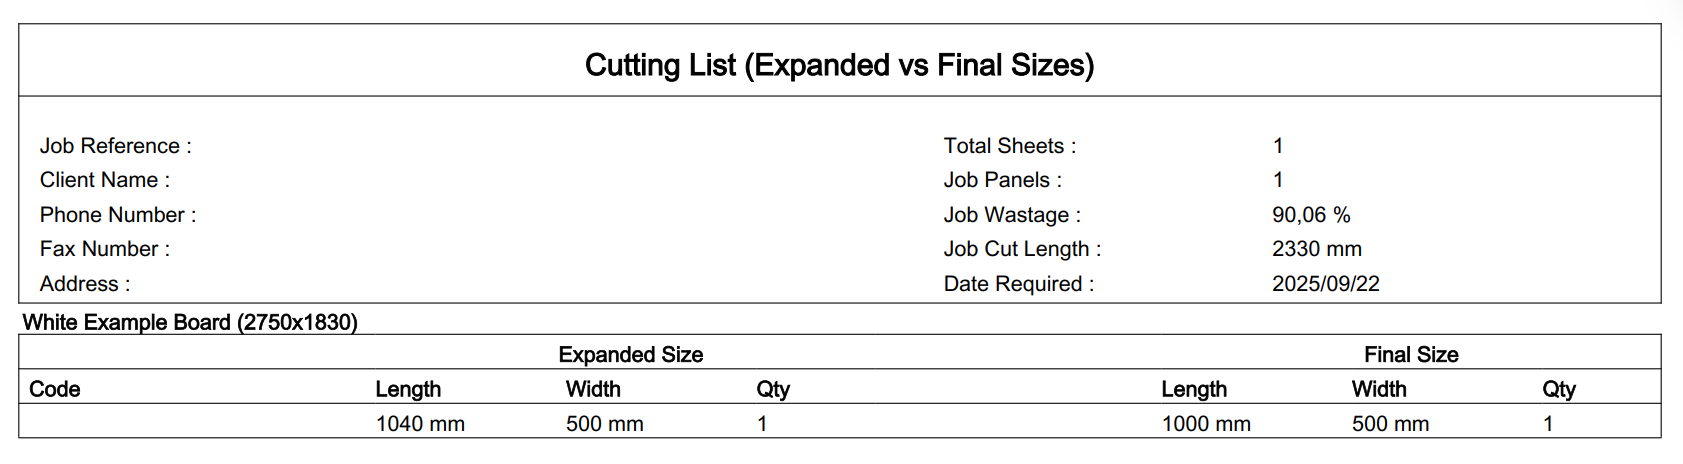
Click Optimize. Note the Expansion Legend showing the expanded sides on the optimized layout, and the length showing the rough-cut dimension of 1040 mm.

Click Print, and select the Cutting List (Expanded vs Final Sizes) to see both the rough cut and final size.
Where sizes appear (Layouts & Reports)
Optimization layouts: Expanded sizes are designated by the Expansion Legend, and layout dimensions show expanded sizes.
Labels that show expanded sizes: 70 mm x 37 mm : A4 Page , 24 Labels with Expanded Sizes.
Reports that show expanded sizes: Cutting List (Expanded vs Final Sizes), Panel Input Item List, and all Job Layout Reports.
Related topics
Panel Default Settings (rotation, defaults for expansions)